このウィジェットは,言うまでもなく択一選択の際に用います.
Ruby/TkではTkRadioButtonクラスが相当します.
使用例を示します.
#!/usr/local/bin/ruby

require 'tk'

var = TkVariable.new('red')
w1 = TkRadioButton.new(nil,
		       'text' => '赤',
		       'value' => 'red',
		       'variable' => var
		      )
w1.pack('side' => 'top', 'fill' => 'both')
w2 = TkRadioButton.new(nil,
		       'text' => '緑',
		       'value' => 'green',
		       'variable' => var
		      )
w2.pack('side' => 'top', 'fill' => 'both')
w3 = TkRadioButton.new(nil,
		       'text' => '青',
		       'value' => 'blue',
		       'variable' => var
		      )
w3.pack('side' => 'top', 'fill' => 'both')

w4 = TkButton.new(nil, 'text' => 'ボタン色変更',
		  'command' => proc{w4.background(var.value);w4.activebackground(var.value)})
w4.pack('side' => 'top', 'fill' => 'both')
w5 = TkButton.new(nil, 'text' => 'quit',
		  'command' => proc{exit})
w5.pack('side' => 'top', 'fill' => 'both')

Tk.mainloop
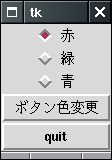
上記のプログラムを走らせると,最初下のようになります.
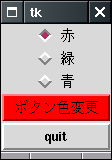
このとき,「ボタン色変更」ボタンをクリックすると,下のようになります.
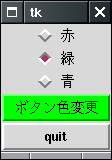
ここで,緑のラジオボタンをクリックして「ボタン色変更」ボタンを押すと,下のようになります.
TkRadioButtonクラスのインスタンス変数を以下に示します.
| インスタンス変数名 | 役割 |
|---|---|
| activebackground | マウスが乗っているときの背景色. |
| activeforeground | マウスが乗っているときの前景色. |
| background | 背景色. |
| foreground | 前景色. |
| disabledforeground | disabled状態のときの前景色. |
| anchor | 配置場所.'n','e','s','w','center'等で指定. |
| bitmap | 表示するbitmap.TkBitmapImageオブジェクトで指定. |
| image | 表示するimage.TkPhotoImageオブジェクトで指定. |
| text | 表示する文字列. |
| textvariable | 表示する文字列変数.TkVariableオブジェクトで指定. |
| justify | 文字列をよせる側."left","center","right"で指定. |
| borderwidth | 枠の幅.整数値で指定. |
| cursor | マウスカーソルの形. |
| highlightcolor | ウィジェットにフォーカスがある時の枠の色. |
| highlightthickness | ウィジェットにフォーカスがある時の枠の幅. |
| relief | ウィジェットの凹凸.'raised'または'sunken'で指定. |
| wraplength | 折り畳むときの1行の文字数. |
| command | 実行するコマンドを記述します.proc{x}とすることで,rubyコマンドxを呼び出せます.このコマンドは,チェックボタンを重ねたマウスの左ボタンを離す時に実行されます. |
| height | ウィジェットの高さ. |
| width | ウィジェットの幅. |
| state | ボタンの状態です.'normal','active'または'disabled'で指定します.'disabled'にすると,ボタンが反応しません. |
| value | ボタンがonになっている時,変数に代入する値. |
| variable | チェックボタンに対する値を格納する変数名.TkVariableオブジェクトで指定します. |
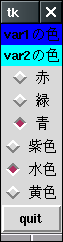
代入する変数名が違えば別グループとみなされ,それぞれ一つずつ選択できます.例えばこんなプログラムの場合です.
#!/usr/local/bin/ruby

require 'tk'
var1 = TkVariable.new('red')
var2 = TkVariable.new('purple')

label1 = TkLabel.new(nil, 'text' => 'var1の色',
		     'background' => var1.value)
label1.pack('side' => 'top', 'fill' => 'both')
label2 = TkLabel.new(nil, 'text' => 'var2の色',
		     'background' => var2.value)
label2.pack('side' => 'top', 'fill' => 'both')

w1 = TkRadioButton.new(nil,
		       'text' => '赤',
		       'value' => 'red',
		       'variable' => var1,
		       'command' => proc{label1.background(var1.value)}
		      )
w1.pack('side' => 'top', 'fill' => 'both')
w2 = TkRadioButton.new(nil,
		       'text' => '緑',
		       'value' => 'green',
		       'variable' => var1,
		       'command' => proc{label1.background(var1.value)}
		      )
w2.pack('side' => 'top', 'fill' => 'both')
w3 = TkRadioButton.new(nil,
		       'text' => '青',
		       'value' => 'blue',
		       'variable' => var1,
		       'command' => proc{label1.background(var1.value)}
		      )
w3.pack('side' => 'top', 'fill' => 'both')
w4 = TkRadioButton.new(nil,
		       'text' => '紫色',
		       'value' => 'purple',
		       'variable' => var2,
		       'command' => proc{label2.background(var2.value)}
		      )
w4.pack('side' => 'top', 'fill' => 'both')
w5 = TkRadioButton.new(nil,
		       'text' => '水色',
		       'value' => '#00ffff',
		       'variable' => var2,
		       'command' => proc{label2.background(var2.value)}
		      )
w5.pack('side' => 'top', 'fill' => 'both')
w6 = TkRadioButton.new(nil,
		       'text' => '黄色',
		       'value' => 'yellow',
		       'variable' => var2,
		       'command' => proc{label2.background(var2.value)}
		      )
w6.pack('side' => 'top', 'fill' => 'both')

quitbutton = TkButton.new(nil, 'text' => 'quit',
		  'command' => proc{exit})
quitbutton.pack('side' => 'top', 'fill' => 'both')

Tk.mainloop
実行時のサンプルは下図の感じになります.TkVariableクラスのオブジェクトvar1とvar2を代入先とするRadiobuttonウィジェットが3つずつ2グループあり,ラベルの背景色が独立して変化します.